The Ultimate Rowing Form Checklist: Avoid These Common Mistakes
Why Proper Rowing Machine Form Can Make or Break Your Workout
Proper rowing machine form is the single most important factor in getting results — and staying injury-free — on the rower.
Here’s a quick summary of correct rowing form:
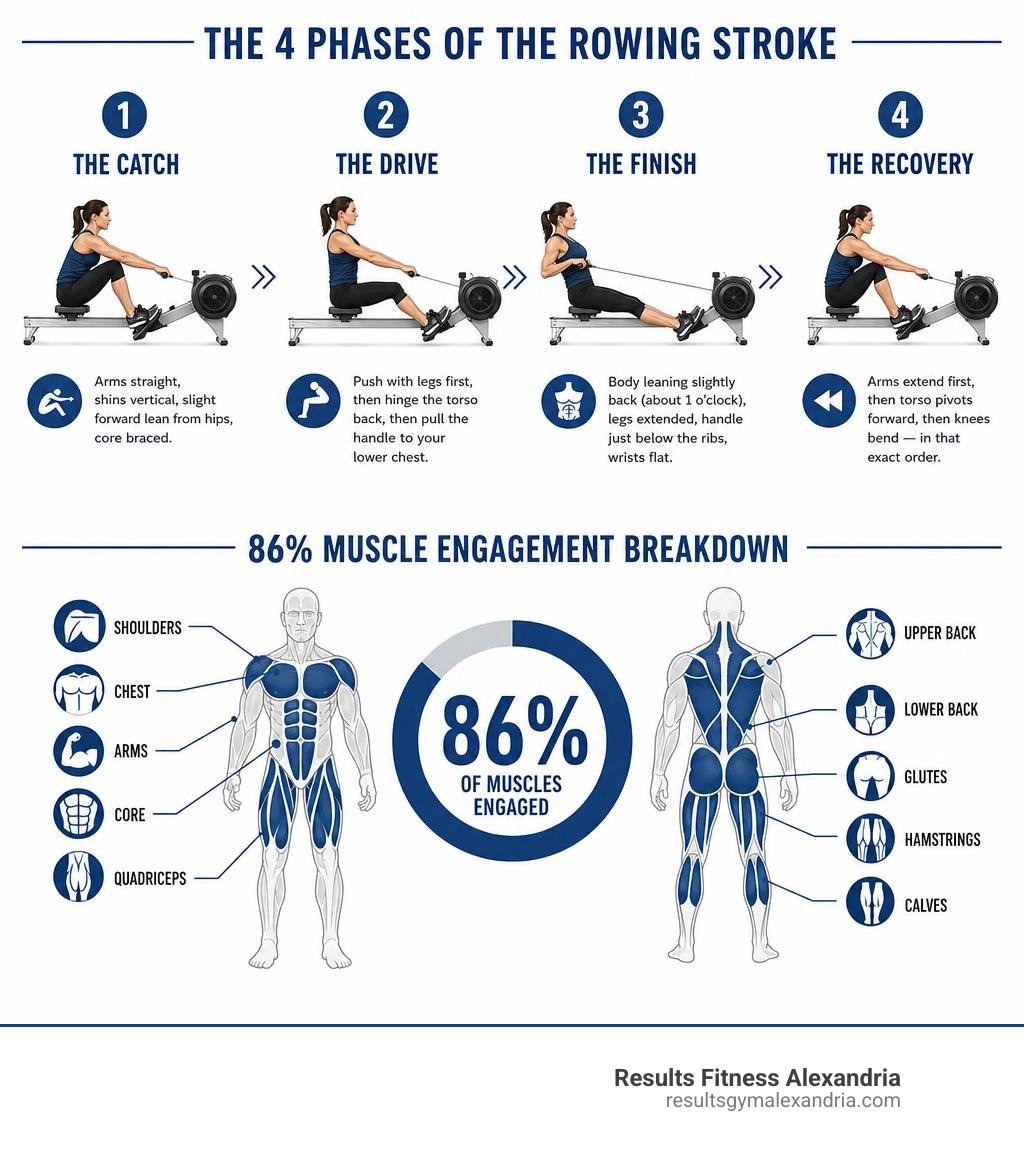
- The Catch – Shins vertical, arms straight, slight forward lean from the hips, core braced
- The Drive – Push with legs first, then hinge the torso back, then pull the handle to your lower chest
- The Finish – Body leaning slightly back (about 1 o’clock), legs extended, handle just below the ribs, wrists flat
- The Recovery – Arms extend first, then torso pivots forward, then knees bend — in that exact order
Remember the sequence: Legs → Body → Arms on the drive. Arms → Body → Legs on the way back.
The rowing machine looks simple. You sit down, grab the handle, and pull. But that’s exactly where most people go wrong.
Done correctly, rowing engages up to 86% of the muscles in your body — making it one of the most efficient full-body workouts available. Done incorrectly, it puts unnecessary stress on your lower back, knees, and shoulders.
The good news? The technique is learnable. Most people pick it up quickly with the right guidance.
I’m Jennifer Rapchak, Fitness Director at Results Fitness Alexandria, and with over 14 years of experience as an ACE-certified personal trainer, I’ve helped countless members master proper rowing machine form — turning a frustrating machine into their favorite workout tool. In this checklist-style guide, I’ll walk you through everything you need to row safely, efficiently, and effectively.
Common proper rowing machine form vocab:
Setting Up Your Ergometer for Success
Before you even touch the handle, you need to set up the machine to match your body. Many beginners jump onto the seat and start pulling without adjusting a thing. This is a fast track to poor mechanics and lower back strain.
1. Footplate and Strap Adjustment
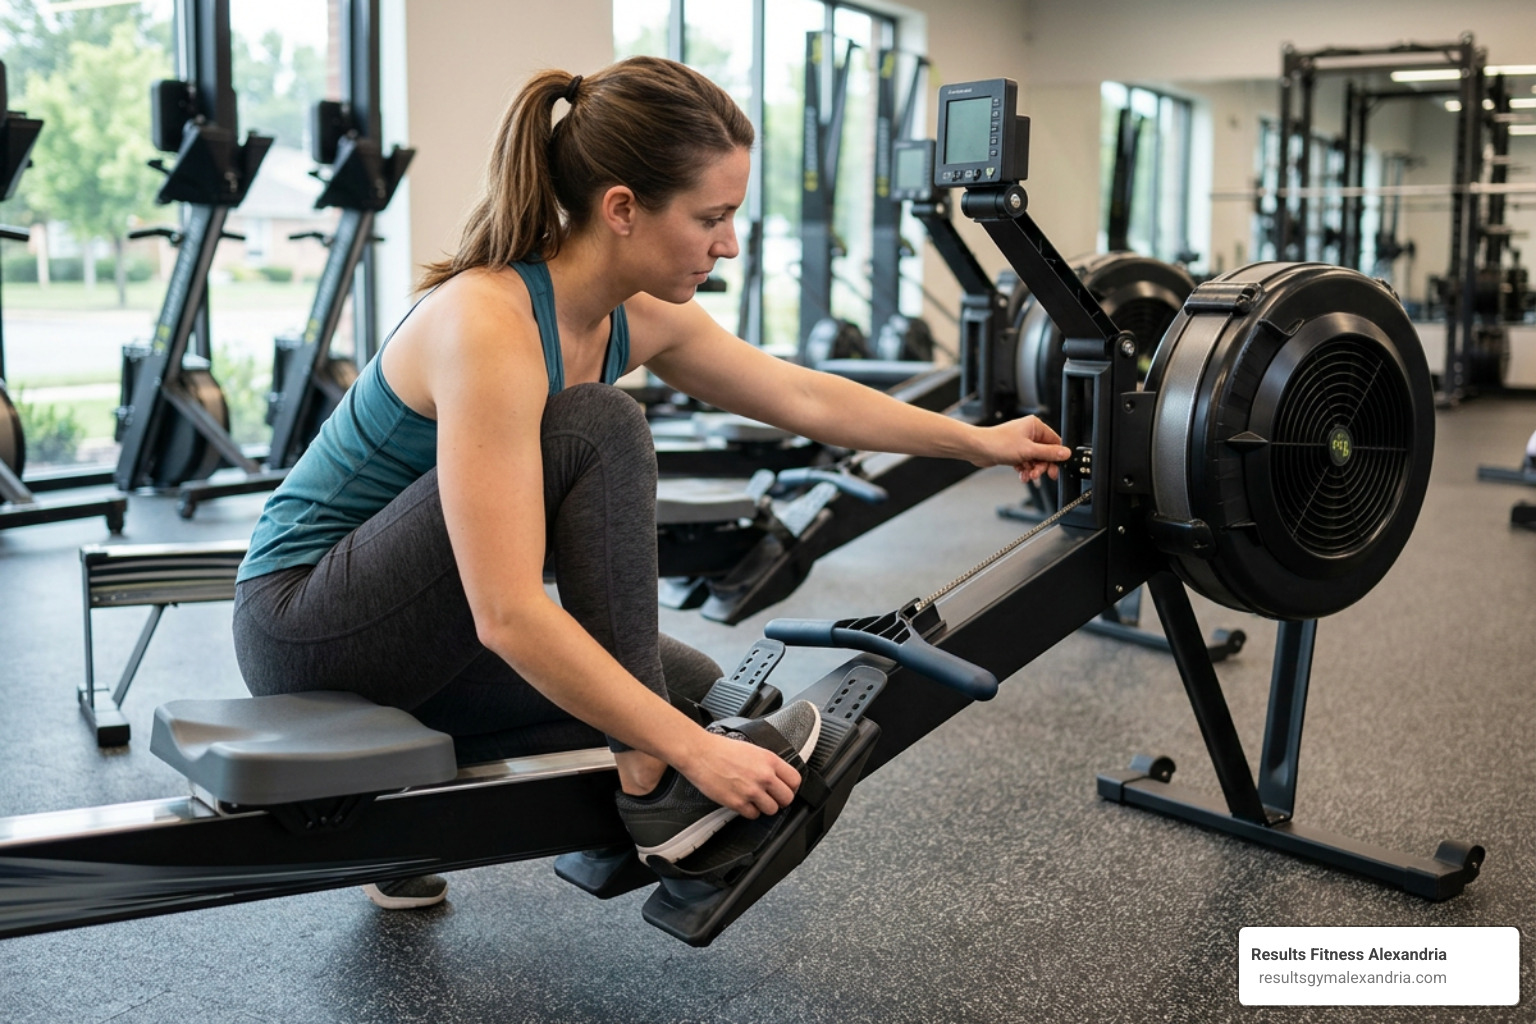
Your feet are your primary connection to the machine. Set the footplate (or “foot stretcher”) height so that the adjustable strap crosses over the widest part of your foot—typically the ball of your foot.
- If the strap is too high (near your toes), your feet will slip out, and you won’t be able to generate power.
- If the strap is too low (near your ankles), you will severely restrict your ankle mobility, making it impossible to slide forward into a strong catch position. Pull the straps tight. Your heels should be able to lift slightly at the front of the stroke, but your feet must remain secure.
2. Understanding the Damper Setting vs. Drag Factor
The damper is the lever on the side of the flywheel housing, usually numbered 1 to 10. The most common myth in the gym is that a higher damper setting equals a better workout.
- The Reality: The damper controls how much air enters the flywheel. Setting it to 10 makes the stroke feel heavy and sluggish, like rowing a heavy wooden boat. Setting it to 1 is like rowing a sleek racing shell.
- The Recommendation: For almost all fitness levels, we recommend keeping the damper setting between 3 and 5. This range mimics the resistance of water and achieves an optimal “drag factor” (typically 110 to 130 on a Concept2 machine), which protects your lower back from excessive loading. Even elite rowers do the majority of their training in this range.
3. Seat Positioning
Sit tall on the center of the seat. Do not slouch or let your tailbone tuck under you. You want to sit on your “sit bones” (ischial tuberosities), keeping your pelvis neutral. This allows your hips to hinge freely as you move.
For a deeper dive into getting started with the erg, check out our The Complete Beginner Guide to Rowing Machine Workouts.
Mastering Proper Rowing Machine Form: The 4 Phases of the Stroke
Rowing is a highly coordinated, continuous movement. To understand it, we break the stroke down into four distinct phases: the Catch, the Drive, the Finish, and the Recovery.
The fundamental rule of rowing biomechanics is the 60-30-10 power distribution rule:
- 60% of your power comes from your legs (the push).
- 30% of your power comes from your core/back (the swing).
- 10% of your power comes from your arms (the pull).
Rowing is primarily a leg-driven exercise, not an upper-body pull. To master this coordination, you can study resources like the Indoor Rowing Technique on the Concept2 RowErg or practice a structured Rowing Machine Workout to build muscle memory.
The Catch and Drive: Initiating Power
The Catch is your starting position at the front of the machine. Think of it like coiling a spring.
Proper Catch Alignment:
- Shins: Vertical (perpendicular to the floor). Do not let your seat hit your heels or your shins go past vertical, as this over-compresses the knees.
- Torso: Leaning slightly forward from the hips (about a 1 o’clock position on a clock face), keeping your spine long and neutral.
- Arms: Fully extended, shoulders relaxed and low (away from your ears).
- Grip: Loose and relaxed, holding the handle with your fingers rather than squeezing with your palms.
The Drive is the work portion of the stroke. It must follow a strict sequential order: Legs first, then Core, then Arms.
The Drive Sequence:
- The Leg Push: Initiate the movement by pressing flatly and powerfully through your feet. Keep your arms straight and your torso hinged forward. Your seat and shoulders should move backward at the exact same speed.
- The Hip Hinge: Once your legs are about half-extended, swing your upper body back from the 1 o’clock position to a slight 11 o’clock lean.
- The Arm Pull: Once your legs are fully extended and your torso is leaning back, draw the handle smoothly to your lower ribs using your upper back and arms. Keep your wrists completely flat.
For practical steps on integrating this power phase into your routine, read our guide on How to Rowing Machine Workout 5 Effective Methods.
The Finish and Recovery: Maintaining Proper Rowing Machine Form
The Finish is the end of the drive phase where you transition back to the front.

Proper Finish Position:
- Legs: Fully extended but not locked out. Keep a soft micro-bend in your knees to protect the joint.
- Torso: Leaning back slightly (about 11 o’clock, or 25 to 30 degrees from vertical), supported by a braced core.
- Handle: Held lightly below the ribs, near the bottom of your sternum.
- Shoulders & Wrists: Shoulders low and relaxed; wrists flat and in line with your forearms.
The Recovery is the rest phase of the stroke. It is the exact reverse of the drive: Arms, then Core, then Legs.
The Recovery Sequence:
- Arms Extend: Straighten your arms completely.
- Torso Pivots: Hinge forward from your hips, swinging your upper body from 11 o’clock back to 1 o’clock. Your hands must pass over your knees before you move your legs.
- Legs Bend: Only after the handle has cleared your knees do you begin to bend your legs and slide the seat forward back to the catch.
The 2:1 Recovery Ratio
To maintain stamina, you must treat the recovery as your rest. A golden rule of rowing is to maintain a 2:1 recovery-to-drive ratio. If your drive takes 1 second of explosive power, your recovery should take 2 seconds of controlled gliding. Rushing the recovery ruins your rhythm and reduces your power output on the next stroke.
To refine this timing, we highly recommend checking out Perfect Your Technique – British Rowing and practicing slow, deliberate strokes.
Breathing and Rhythm: The Key to Proper Rowing Machine Form
Rhythm is what makes rowing feel fluid instead of mechanical. Your breathing pattern directly dictates this rhythm.
- The Pattern: Inhale during the recovery (as you slide forward) and exhale sharply during the drive (as you push back).
- For High Intensity: If you are rowing at a higher stroke rate, transition to a two-breath cycle: exhale at the finish, inhale on the recovery, exhale at the catch, inhale on the drive.
Proper breathing keeps your core stable and ensures your muscles receive a steady supply of oxygen. For a quick routine to practice your breathing and rhythm, try our Row Your Way to Fitness in a 10-Minute Rowing Machine Workout.
Muscles Targeted and Health Benefits of Correct Technique
Rowing with proper rowing machine form uses up to 85% to 86% of your entire musculature. Unlike running or cycling, which primarily target the lower body, rowing is a true full-body strength and cardiovascular workout.
Muscular Engagement Breakdown:
- Lower Body (60%): Your quadriceps, glutes, hamstrings, and calves generate the initial explosive force during the leg push.
- Core & Back (30%): Your erector spinae, latissimus dorsi, rhomboids, and abdominals transfer power from your legs to your upper body while protecting your spine.
- Upper Body (10%): Your biceps, deltoids, and forearms finish the stroke by drawing the handle to your chest.
| Muscle Group / Feature | Rowing Machine (With Proper Form) | Stationary Cycling |
|---|---|---|
| Total Muscle Activation | ~86% of body’s muscles | ~45% of body’s muscles |
| Primary Lower Body | Quads, Glutes, Hamstrings, Calves | Quads, Glutes, Hamstrings |
| Primary Upper Body | Lats, Rhomboids, Biceps, Traps | Minimal (Stabilization only) |
| Core Engagement | High (Continuous hip hinge) | Low to Moderate |
| Joint Impact | Very Low (Non-weight bearing) | Low |
Health and Fitness Benefits:
- Low-Impact Cardio: Because your feet remain in contact with the footplates and you are seated, rowing has virtually zero joint impact. This makes it an exceptional alternative for individuals with achy knees or those recovering from running injuries.
- Joint Strength: A study showed that rowing three days per week for eight weeks significantly improved joint strength and mobility.
- Body Fat Reduction: Research indicates that 40 minutes of rowing, five days per week for six weeks, helped decrease body fat and significantly improve back strength.
- Cardiovascular Fitness: Even a short, 20-minute rowing session at proper form provides incredible cardiovascular and muscular endurance benefits.
Learn more about how this translates to your long-term health in our article on Row-Row-Row Your Way to Fitness with These Incredible Rowing Machine Benefits.
The Ultimate Rowing Form Checklist: Common Mistakes to Avoid
Even experienced gym-goers make critical errors on the rower. Use this checklist to identify and correct the most common form mistakes.
1. Shooting the Slide (The “Butt Wink”)
- The Mistake: Your legs push straight, but your upper body stays forward, causing your seat to shoot backward first. This leaves your lower back to pull the weight of the handle alone.
- The Fix: Keep your core braced. Your shoulders and seat must move backward at the exact same time during the first half of the drive.
2. Rounding the Spine (The “Hunchback”)
- The Mistake: Slouching over the handle at the catch or finish, putting immense pressure on your lumbar spine.
- The Fix: Keep your chest proud, look slightly above the monitor to align your neck, and hinge only from your hips.
3. Early Arm Bend (The “Chicken Wings”)
- The Mistake: Bending your elbows as soon as you push off the footplates. This wastes arm strength and cuts your leg power short.
- The Fix: Keep your arms completely straight like ropes until your legs are fully extended and your torso has swung back.
4. Rushing the Recovery (The “Knee Bumping”)
- The Mistake: Bending your knees on the return before extending your arms. The handle will hit your knees, forcing you to lift the handle over them in a jerky, inefficient motion.
- The Fix: Focus on the sequence: Arms extend, torso hinges, then knees bend.
5. Knee Lockout
- The Mistake: Slamming your knees straight and locking them out at the finish. This puts dangerous stress on your knee joints and tendons.
- The Fix: Keep a soft, active micro-bend in your knees at the end of the drive.
To practice drills that naturally cure these habits, read Row Your Way to Fitness with This Ultimate Full Body Routine.
Frequently Asked Questions About Rowing Technique
We hear many questions from our members at Results Fitness Alexandria about optimizing their indoor rowing. Here are our expert answers to help you dial in your technique.
What is a good stroke rate (SPM) and damper setting for beginners?
For beginners, we recommend keeping your stroke rate between 18 and 24 strokes per minute (SPM).
A lower stroke rate forces you to focus on the technical sequence and build power through your leg drive rather than relying on frantic speed. Keep your damper setting between 3 and 5 (aiming for a drag factor of 110–130). As you advance, your split times (speed) should improve through stronger leg drives, not by sliding faster or turning the damper up to 10.
For more technical breakdowns, you can refer to comprehensive guides like Mastering Proper Rowing Machine Form for Maximum Power and Safety | Oreate AI Guides or How to Use a Rowing Machine Correctly: A Step-by-Step Guide – NordicTrack.
How often and how long should a beginner row?
If you are brand new to rowing, start small:
- Duration: Begin with 5 to 10 minutes of continuous rowing to focus purely on form. Once your posture remains steady without fatigue, progress to 15 to 20 minutes.
- Frequency: Row 2 to 3 times per week. This allows your back and core muscles time to adapt and recover.
To help structure your early sessions, try using the workouts in Row Your Heart Out with These 20-Minute Workouts.
How can I check and improve my rowing form at home or the gym?
Because you cannot easily see yourself while rowing, we recommend using these three feedback loops:
- The Mirror Test: Set up your rower parallel to a mirror so you can glance over during your recovery to check your posture and hip hinge.
- Video Analysis: Set up your phone on a tripod to record a 1-minute video of your rowing from the side. Compare your positions to the checklists in this guide or watch video tutorials like The Official 2026 Rowing Form Checklist (PERFECT STROKE!).
- Work with a Coach: Having an expert eye watch you in real-time is the fastest way to break bad habits. You can also read expert blogs such as How to Use The Rowing Machine: Proper Rowing Machine Form or Learn rowing technique correctly – Posture, errors & tips for deep technical cues.
For more hands-on help, our trainers are always on the floor ready to assist. If you are looking for structured classes and personalized guidance, our team at Results Fitness Alexandria is here to help you master your technique and reach your fitness goals.
Conclusion
Mastering proper rowing machine form is a journey of coordination, rhythm, and patience. By focusing on the correct setup, prioritizing the “Legs-Body-Arms” sequence, and avoiding common mistakes like rushing the recovery, you will unlock a highly efficient, joint-friendly, full-body workout that builds real strength and endurance.
At Results Fitness Alexandria, we believe that fitness should be accessible, safe, and highly rewarding for all levels. Whether you want to perfect your rowing technique under the guidance of our certified personal trainers, join our high-energy fitness classes, or stretch out in a yoga session, we have everything you need to reach your goals.
Ready to put your rowing form to the test on our premium equipment? Come visit our Alexandria, Virginia location and try our facilities out. Try our premium cardio amenities today! and claim your free 1-day pass. Let’s row our way to better fitness together!